As we witnessed in the previous installment of Experience Express, selecting a robust mechanism for authenticating incoming requests is a key component of any decoupled Drupal decision-making process. After all, you cannot always necessarily predict the input sanitization features in place on consumers like JavaScript applications and native mobile applications.
In the previous installment, we covered OAuth 2.0 Bearer Token authentication.
Though JSON Web Tokens (JWT) is a younger specification than its more well-established cousin, JWT (pronounced jot) has been adopted by quite a few in the Drupal community due to its relative simplicity. JWT's primary advantages include an easy-to-parse JSON structure and a relatively wide range of users in the web development community. In this installment, we explore JSON Web Tokens and how this authentication mechanism can benefit your decoupled Drupal architecture.
An introduction to JSON Web Tokens (JWT)
Expressed in RFC 7519, JSON Web Tokens (JWT) is an emerging authentication standard whose tokens are rendered in JSON objects. These tokens are signed in one of two ways: either via a secret through the HMAC algorithm or a public–private key pair through RSA or ECDSA. The vast majority of JWT implementations perform user session authorization and authentication for information exchanges.1
The JSON Web Token Authentication module in the Drupal contributed ecosystem implements the JWT standard in Drupal and is maintained by Jonathan Green (jonathan.green) and Gabe Sullice (gabesullice), offering an authentication provider that permits the verification of information via a digital signature.
Individual tokens in JWT consist of three components separated by a dot: the header, the payload, and the signature.
header.payload.signature
The initial component of a JWT is the header, which expresses the type of token (e.g. JWT) and the hashing algorithm that was used to encrypt the payload (e.g. HMAC SHA256 or RSA). The header is expressed as a JSON object.
{
  "alg": "HS256",
  "typ": "JWT"
}
To get a header that adheres to the JWT standard, we base64url-encode the JSON object, which becomes the JWT header.
eyJhbGciOiJIUzI1NiIsInR5cCI6IkpXVCJ9
The second component of the JWT is the payload, which expresses a claim (or statement of information) about the consumer's identity, the data we are transmitting, and other details about the token. Here is an example registered claim expressed as a JSON object, where iss is the token's issuer, exp is the time to expiration, and the other keys are information we wish to transmit.
{
  "iss": "jwt-drupal-backend.net",
  "exp": 1534864265,
  "name": "Preston So",
  "admin": true
}
The JWT payload is also base64url-encoded, just like the JWT header.
ewogICJpc3MiOiAiand0LWRydXBhbC1iYWNrZW5kLm5ldCIsCiAgImV4cCI6IDE1MzQ4NjQyNjUsCiAgIm5hbWUiOiAiUHJlc3RvbiBTbyIsCiAgImFkbWluIjogdHJ1ZQp9
Just as crucial, the final component is the signature, which consists of a hash of the base64url-encoded header, the base64url-encoded payload, and the secret (the "signature" available to the server that verifies incoming tokens and signs outgoing tokens). The same algorithm specified in the JWT header has to be used to generate the signature.
If you are using HMAC SHA256 as your algorithm, you can create your signature by writing code such as the following.
const signature = HMACSHA256(
  base64url(header) + '.' + base64url(payload),
  secret
);
Here is an example signature.
jIyIIA6wMwGCLE2fyIU1f_Y9e3Nn4rPC3Ta1MzoAKLA
Finally, we combine all three components—the header, the payload, and the signature—into a single string, with each component dot-separated.
eyJhbGciOiJIUzI1NiIsInR5cCI6IkpXVCJ9.ewogICJpc3MiOiAiand0LWRydXBhbC1iYWNrZW5kLm5ldCIsCiAgImV4cCI6IDE1MzQ4NjQyNjUsCiAgIm5hbWUiOiAiUHJlc3RvbiBTbyIsCiAgImFkbWluIjogdHJ1ZQp9.jIyIIA6wMwGCLE2fyIU1f_Y9e3Nn4rPC3Ta1MzoAKLA
While covering how JSON Web Tokens work is beyond the scope of this column for today, you can learn more about how JWTs operate in the forthcoming book Decoupled Drupal in Practice, written by this author. Preorder your copy on Amazon or on Apress to get all of these insights and more.
Installing JWT and creating keys
While the JWT module remains in an alpha release and should not be leveraged on production without extreme caution, you can use the Drupal JWT implementation today on development and testing environments. Because the module comes with its own composer.json file and depends on both the Key module and firebase/php-jwt third-party PHP library, you should use a Composer-based workflow to perform installation.
$ composer require drupal/jwt
$ drush en -y jwt jwt_auth_consumer jwt_auth_issuer
Don't forget to enable the two additional constituent modules within JWT.2
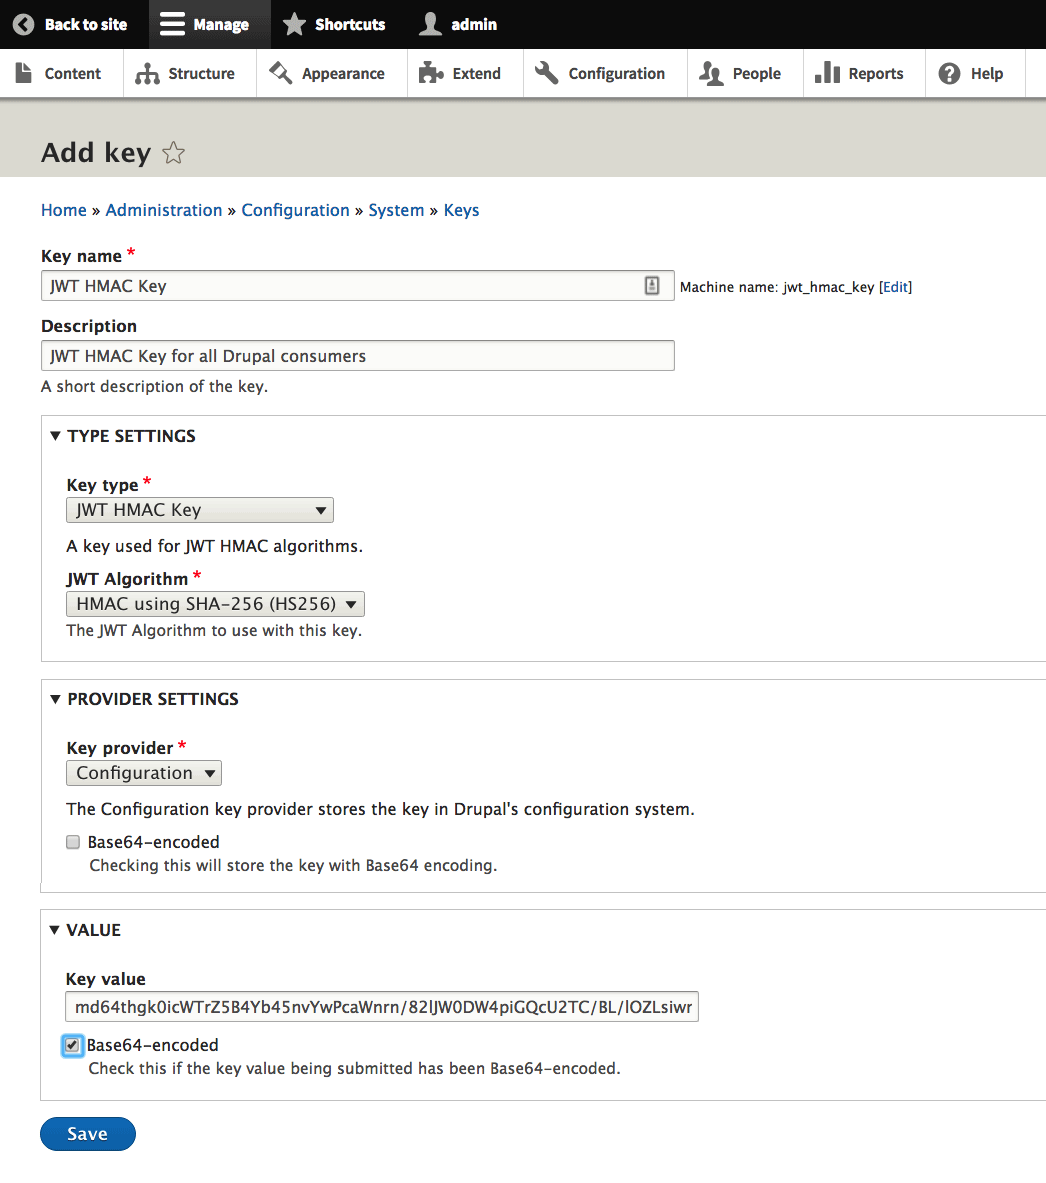
Now that we have installed the module, we need to create keys that will help us sign and validate our JWTs. This functionality is conferred by the Key module in Drupal, a dependency of the JWT module. Navigate to Configuration > System > Keys (/admin/config/system/keys) to add or remove keys. In Drupal, we can think of keys as synonymous with JWT secrets.1
If you prefer to use the HMAC algorithm, generate a file-based key of 256 bits, base64-encoded, as in the following example.
$ head -c 64 /dev/urandom | base64 -w 0 > /path/to/private/keys/jwt.key.txt
Here is a sample HMAC key.
md64thgk0icWTrZ5B4Yb45nvYwPcaWnrn/82lJW0DW4piGQcU2TC/BL/lOZLsiwnSn0dinr1rZOmww0nZ9Aurg==
To use RSA instead, generate a file-based key of 2048 bits using the command below.
$ openssl genrsa -out private.key 2048 > /path/to/private/keys/jwt.key.txt
After creating the key that your consumers will leverage, you can navigate to Configuration > System > Keys (/admin/config/system/keys) in order to decide whether the key should be stored in configuration (input the key value in the form field) or listed as a file reference (on the server).

Here, we store our key in configuration, so we have inputted the result of our HMAC key generation into the "Key value" field.
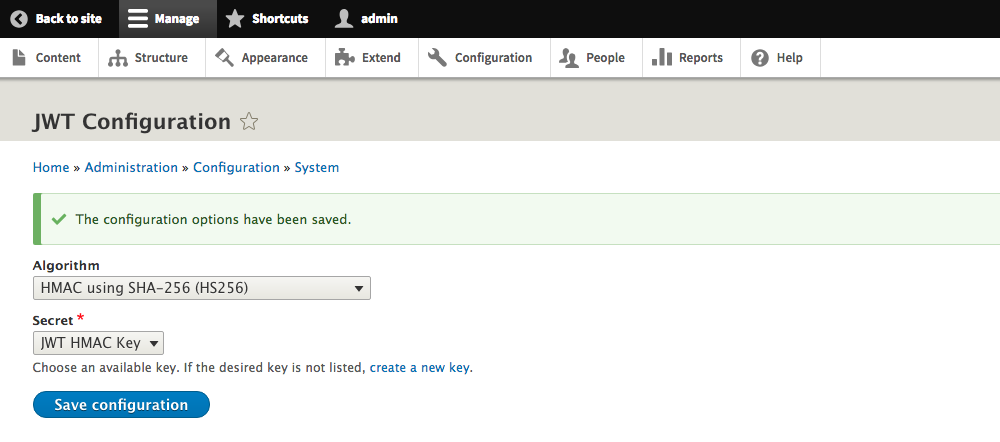
Now, head to Configuration > System > JWT Authentication (/admin/config/system/jwt), where we choose our available key and designate it as the key of choice for JWT issuance and verification.

Apply the generated key as the secret for HMAC SHA256, our algorithm of choice for JWT.
How to issue and validate JWTs
The JWT Authentication Issuer module provides an endpoint at /jwt/token, where you will find generated JWTs for consumers that wish to issue authenticated requests. As a logged-in user, or when you issue a GET request against /jwt/token with credentials of a user with the appropriate permissions, you will receive a token like that seen below, with which we can issue authenticated requests to Drupal.
eyJ0eXAiOiJKV1QiLCJhbGciOiJIUzI1NiJ9.eyJpYXQiOjE1MzQ4ODc2MzMsImV4cCI6MTUzNDg5MTIzMywiZHJ1cGFsIjp7InVpZCI6IjEifX0.jIyIIA6wMwGCLE2fyIU1f_Y9e3Nn4rPC3Ta1MzoAKLA

Figure 9-9. To get to your token, navigate to /jwt/token in the browser after providing your key (JWT secret) and enabling the JWT Authentication Issuer module.
Now, we can retrieve content by issuing a request authenticated by JWT from the consumer's standpoint. Although we now have the ability to issue and validate JWTs on the Drupal side, we do not yet have REST resources configured in such a way that would allow them to recognize incoming JWT-authenticated requests. Luckily, the REST UI module, covered at length in Chapter 8 of Decoupled Drupal in Practice, can accelerate this process.
If you have not yet, enable the core REST (RESTful Web Services) and REST UI modules.
$ composer require drupal/restui
$ drush en -y rest restui
When you navigate to Configuration > REST (/admin/config/services/rest), you will see the configuration interface for REST UI and make resources available for core REST to expose. When we edit the settings for all Content resources by navigating to the Settings for resource Content page (/admin/config/services/rest/resource/entity%3Anode/edit), you will encounter a jwt_auth option under Authenticated providers. Go ahead and enable that jwt_auth option to allow for all content entities to be retrieved through JWT-authenticated requests.
In order to test requests authenticated with JWT, one thing we can do is to modify permissions on accessing content such that anonymous users lack the privileges necessary to view content entities. Disable the View published content permission for all anonymous users on the People > Permissions (/admin/people/permissions) page.
To get the token, we can issue a GET request to /jwt/token or simply navigate to it as an administrator. Then, just like we did in the previous installment with OAuth 2.0, include an Authorization header in the consumer's request with a Bearer prefix. Once Drupal interprets the request as authenticated with JWT, the JWT module will validate the token, and Drupal will proceed to serve the requested resource.2
Authorization: Bearer
eyJ0eXAiOiJKV1QiLCJhbGciOiJIUzI1NiJ9.eyJpYXQiOjE1MzQ4ODc2MzMsImV4cCI6MTUzNDg5MTIzMywiZHJ1cGFsIjp7InVpZCI6IjEifX0.jIyIIA6wMwGCLE2fyIU1f_Y9e3Nn4rPC3Ta1MzoAKLA
Conclusion
Though the JWT module still needs more time to mature before it reaches full stability, this column illustrates why it is such a compelling option for authentication in decoupled Drupal architectures. Its simple structure and relatively straightforward usage lend it significant advantage when it comes to consideration for authentication mechanisms. Nonetheless, for those valuing stability over all else, choosing OAuth 2.0 may make more sense in the short term.
If you are interested in OAuth 2.0 and JSON Web Tokens as well as their differences and comparative advantages, consider preordering a copy of my forthcoming book, Decoupled Drupal in Practice, where you will find insights ranging from server setup and authentication to far-flung areas such as decoupling Drupal with Angular, Ember, React, React Native, and Vue.js. If there is something you want to see me write about, please reach out at [email protected]. In the meantime, see you on the next installment of Experience Express. All aboard!
Works cited
- "Introduction to JSON Web Tokens." JWT. Accessed 20 August 2018. https://jwt.io/introduction/
- Chan, Edward. "Using JSON Web Tokens (JWT) to Authenticate Requests to REST Resources in Drupal 8." Mediacurrent. 23 March 2017. Accessed 21 August 2018. https://www.mediacurrent.com/blog/using-json-web-tokens-jwt-authenticate-requests-rest-resources-drupal-8/
- "JSON Web Token Authentication (JWT)." Drupal.org. 19 February 2016. Accessed 21 August 2018. https://www.drupal.org/project/jwt


